Are you about to launch the creation or redesign of your WordPress site? Before taking the plunge, have you thought about creating an essential document?
A document that is still too often overlooked, due to lack of knowledge or lack of time, even though it is so essential to the success of a web project.
This document is the specification document for a WordPress website. Not sure how to go about crafting it like an expert?
By the end of this article, after following 6 key steps, you will be able to create your own tailor-made version, like a pro. As a bonus, you will even find an example structure to guide you.
With that, you can be sure to get your next site off to a flying start, and in the right direction!
What is a specification document for the web?
A specification document is a written document that presents the major elements related to a project to create or redesign a WordPress site.
In particular, it details the needs, constraints, ideas, concepts, and objectives of the person or company wishing to design a website.
It also lists the various service providers who will be involved throughout the project, as well as the site’s graphic, functional, budgetary, and strategic aspects.
A good specification document sets the guidelines for a web project, but it is not a summary. On the contrary, it allows you to present your project in detail.
This is why you need to make sure you are as precise and comprehensive as possible when writing it. And this applies whether you want to design your site yourself or entrust this task to a WordPress specialist agency.
What elements should be included in a specification document?
Although there is no “fixed” method for creating a relevant website specification document, several key concepts should be included. In particular, remember to present:
- your needs in creating this project, as well as any potential constraints;
- the site structure and its type (showcase site, e-commerce site, custom-built site, etc.);
- quotes and the budget;
- all the tasks to be carried out;
- the people involved in the project and their respective roles;
- the project and the different stages in chronological order;
- the graphic charter, the technology used (e.g.: WordPress), the languages used on the site, etc.;
- the order of priority for the different actions to be carried out;
- the content, the SEO strategy (Search Engine Optimization), maintenance solutions, and social media presence;
- the delivery date;
- an assessment of the existing situation (in the case of a redesign).
That’s a first preview of what awaits you when you start working on the specification document for your next WordPress site.
Please note that if you are a service provider, it is of course your client who will be responsible for completing your specification document when they request a quote from you.
For example, you can guide them by providing a ready-to-use template and helping them fill in the requested information.
Before discussing all of this in depth and addressing the writing phase of the web specification document, first discover the reasons why this document is essential when designing/redesigning a WP site.

Why is the specification document essential for creating or redesigning a WordPress site?
Writing a specification document is essential to the success of your project for several reasons, which are also advantages.
- this document saves you a great deal of time. At any time, you can refer to it to review the various stages and elements of the WordPress site to be created;
- the service provider and the client gain readability and clarity, since everything has been mapped out from the start.
A specification document limits the risk of unpleasant surprises during the project, as well as time-consuming back-and-forth between the various project stakeholders; - a website specification document can serve as evidence in the event of a dispute with a service provider, because it is an official document;
- it prioritizes the various operations to be carried out and helps you lay out all your ideas. It identifies all the essential tasks to be completed and presents the client’s needs;
- the various contributors can more easily estimate the actual workload and the cost associated with each requested service;
- as a formal and official document, a specifications document lends credibility and professionalism to your project.
Thanks to it, you plan the creation of the site and set delivery deadlines that will serve as benchmarks for all stakeholders; - the specifications document for a WordPress website is not set in stone: if you have forgotten certain elements, you can always complete it and adjust it in due course.
As effective as it may be, the specifications document is primarily intended for projects of a certain “scale.” In practical terms, don’t hesitate to use one when you want to:
- create a WordPress site from scratch;
- completely redesign a WordPress site to bring it up to date visually, for example.
On the other hand, you can skip this formal document for small projects that do not require much time. For example, this includes:
- creating a single page to rank for a specific query, in order to improve your organic SEO;
- visual changes or the addition of certain features such as installing an SSL certificate to move your site to HTTPS, creating a child theme, adding a complex form, etc.
After this theoretical overview, let’s move straight on to practical implementation. Take a detailed look at which elements should appear in the specifications document for your WordPress website.
How to write specifications for your WordPress website in 6 steps
Writing your specifications document is done in several stages. As you will see, they are essential for structuring your content and ensure you don’t forget anything when drafting it.
Once again, remember that your specifications document must be a model of clarity, readability, and precision.
To do this, beyond the text, include all the graphic/visual elements that will make the document easier for readers to understand: images, illustrations, screenshots, functional mockups, logos, diagrams, tables, etc.
Finally, regarding its format, keep in mind that web specifications are most often delivered in PDF or text format (Word, Google Docs, LibreOffice, WPS Writer, etc.).
All good for you? Now dive into the first writing step.
Step 1: Present the project
To start, the specifications document for a WordPress website presents the project in overall terms, covering the following topics: the company, the project, stakeholders, objectives, and the target audience.
Company and project presentation
As an introduction, start by showcasing your company and the project, over 1 or 2 pages.
Regarding your company, list:
- its name and creation date;
- its contact details: email, telephone number, address, SIRET, etc.;
- its number of employees;
- its revenue;
- its business sector;
- its estimated budget;
- the products and/or services you offer.
Also remember to list your competitors, indicating their website address, then briefly explaining their strengths and weaknesses.
In a few lines, detail the marketing/web marketing strategy that will need to be implemented to set you apart from the competition.
In the case of a redesign, you will also need to devote a chapter to the existing site. Present its characteristics (technology used, traffic statistics, language used, etc.), as well as the resources currently available:
- the site URL;
- the registrar with whom the domain name was reserved (Gandi, OVH, o2switch, etc.);
- the hosting provider: OVH, o2switch, Ionos 1&1, etc.
- the CMS (Content Management System) used: WordPress.org or WordPress.com, Joomla, Drupal, Wix, Shopify, Squarespace, etc.
- the existence of WordPress maintenance, etc.
Presentation of stakeholders
To facilitate communication between the different parties, indicate the contact details of each stakeholder (web project manager, developer, web copywriter, graphic designer, SEO manager, communications manager, etc.):
- first and last name;
- position held and role in the project;
- contact details (email or even phone number).
Details of the creation objectives in the specifications for your WordPress website
Thirdly, first present the type of site desired: showcase site, e-commerce, media, etc.
Then follow up by explaining why you want to create or redesign your WordPress site, and what it will be used for.
The overall objective here is to place the creation of the website within your company’s strategy. Here are a few ideas to guide you:
- Is this next site a tool for presenting your services?
- Do you want to use it to develop your online visibility and reputation?
- Is it rather a lever for winning over a new clientele or a new market?
- Are you counting on it to sell your products and services, in the case of creating an online store, for example?
- Do you want to use it to increase your traffic on social media?
Still with precision in mind, detail your overall objectives by giving them dates and figures. For example, you may want to find 100 new customers with your WordPress site by December 2022.
With this in mind, it is wise to present your objectives quantitatively, for example using key performance indicators (KPI, Key Performance Indicator):
- target traffic volume;
- sales objective;
- expected number of leads per day/week/month;
- average revenue;
- the bounce rate;
- the click-through rate on your pages;
- the cart abandonment rate in e-commerce.

Defining the target audience
Finally, the specifications for your WordPress website must present your target audience, meaning the public you are going to address.
To do this, you can provide the following information:
- the type of target audience: B2B (businesses), B2C (individuals) or both;
- its characteristics: age, CSP (socio-professional category), gender, business sector, budget, interests, etc.;
- its consumption habits, such as the type of devices it primarily uses to browse the internet (computer, smartphone or tablet).
This is very important when creating a responsive website (readable on all types of devices). Also indicate its level of proficiency with digital tools; - their geographic location, very useful for knowing which language the site should be designed in.
To get a clear understanding of your target audience, you can create personas, that is, fictional representations of your ideal customers. HubSpot’s free Make My Persona tool is a good starting point to begin with.
Thanks to these personas, the various stakeholders in the project will have a more concrete and precise vision of the users you are targeting.
Step 2: Define your users’ needs
Without further ado, let’s move on to step number 2 in creating the specifications for your WordPress website: defining user needs.
You need to put yourself in their shoes and imagine the actions they are likely to take while browsing your website.
To do this, ask yourself the following questions and provide precise answers:
- What are the needs of the customers who will visit your site? Do they want to buy something? Are they looking for specific information? Do they want to download a document?
- What will the user journey be once they land on your pages?
- How can you make navigation as smooth as possible?
Knowing users’ needs will allow you to detail the essential features of your site. For example, if they are looking for information about your products or services, a Blog page may be useful for presenting them in more detail, using dedicated tutorials.
If you sell products, e-commerce features will be necessary (Cart, Checkout, Payment page, etc.).
Not forgetting order tracking, with support. In this case, you might consider creating an FAQ or having a chatbot.
Step 3: Describe the graphic and ergonomic aspects of the WordPress website
This step should enable your specifications to present your requirements in terms of visual/graphic identity, ergonomics, and communication.
Design and visual identity guidelines
If you have visual identity guidelines, include them in your website specifications. This document presents the elements that make up your visual identity, namely:
- the site colors. A good practice is to use no more than 2 or 3 main colors. To combine them properly, use tools such as ColorHunt, Material Palette, or the Adobe Color Wheel;
- the logo. If you don’t have one, you can give an idea of what you want by designing it with a service such as Logogenie or Canva;
- typography, that is, the fonts used on your site. You can find inspiration on Google Fonts, Font Squirrel, or Da Font;
- visuals and icons, which you can find on Iconfinder or The Noun Project;
- mockups with the addition of flyers or brochures used in your company’s communication.

You don’t have a graphic charter? No problem. Be as specific as possible by providing examples of websites, colors, fonts, visual effects, and other logos that you like and that inspire you.
Simply list the corresponding URLs for your service provider, explaining what you like… and what you like less. You can also add screenshots to make everything more concrete.
Navigation and usability
After the graphic charter, elaborate on what you expect in terms of navigation and usability.
Here again, you should describe your expectations based on the needs of your target audience. For example, you might consider the design of:
- a responsive website;
- a very specific navigation system;
- an internal search engine;
- specific buttons;
- a site map for each page;
- a menu with a maximum of X or Y entries;
The importance of wireframes, zonings, and mockups in the web specifications document
If you can, don’t hesitate to use different techniques to show the placement of the various graphic elements on your site’s pages, as well as the desired rendering.
To do this, you can create the elements below, listed from the least detailed to the most detailed:
- zonings, which present the elements of your page in the form of blocks;
- wireframes, i.e. functional mockups showing the structure of your pages. You can create them as sketches, with a pencil and a pen. But the simplest and most practical approach, especially to make corrections and collaboration easier, is to use an online tool such as Balsamiq Wireframes or MockFlow;
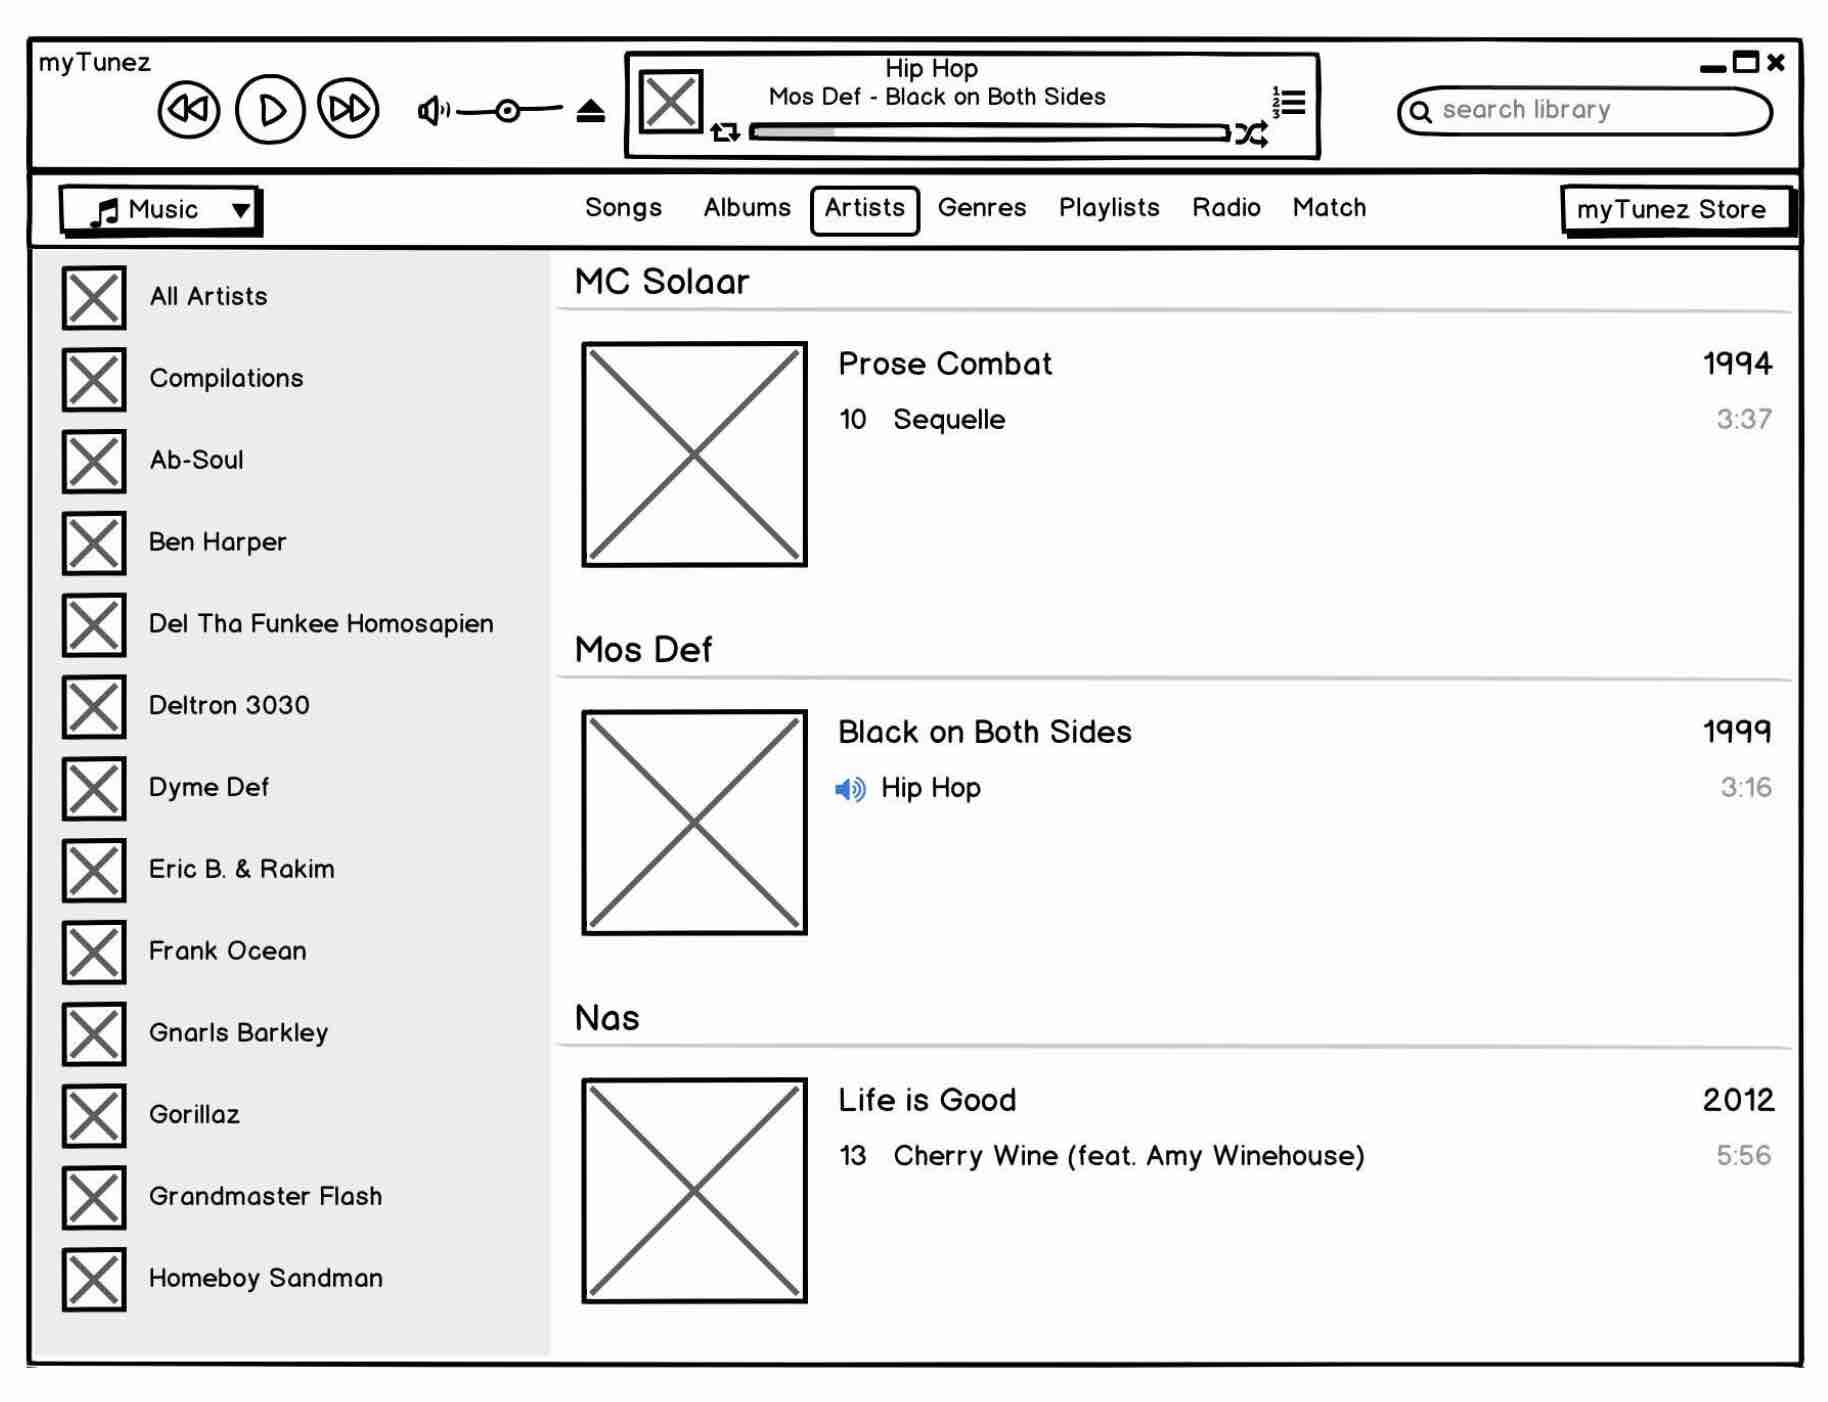
- mockups, which show the final design of your pages. Creating them is not necessarily required at this stage, as they require expertise and technical skill.
However, add them to your specifications document if you have them. It is always a plus for the service provider.
Step 4: Detail the functional and technical aspects of the project in the WordPress website specifications document
During step 4, detail the functional and technical aspects of the site, namely its structure, the desired features, and the presence of content.
The site’s structure
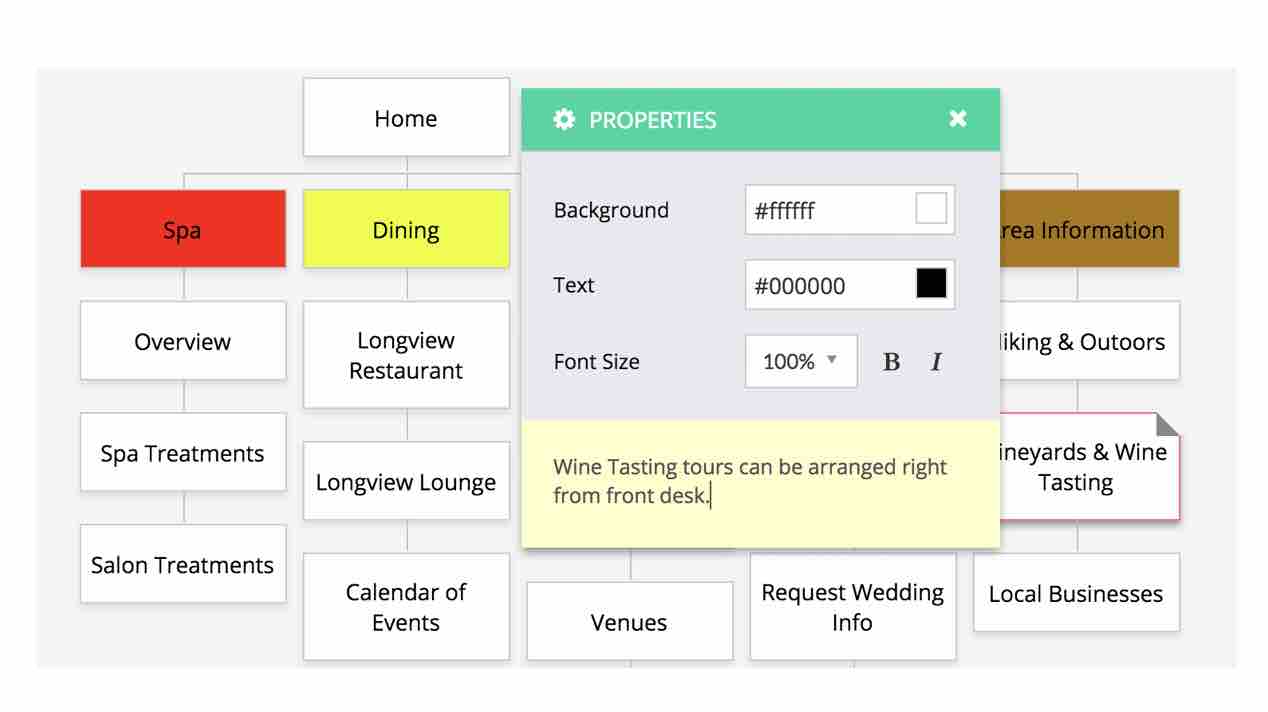
By structure, we mean the architecture of a website in the form of a diagram, with the various sections and navigation levels.
This structure will allow you to list the main strategic pages of your site: Home, About, Services, Contact, etc.
A successful website structure primarily helps strengthen the user experience, but it can also have positive impacts in terms of SEO (Search Engine Optimization), as it helps search engines better understand the context of your content.
To design it, use tools such as GlooMaps, MindMeister or Balsamiq.
Speaking of pages, also remember to mention, in the specifications for your WordPress website, the presence of Legal Notice and Privacy Policy pages, etc. Not forgetting the design of any custom landing pages, if needed.
The different features expected in the specifications
What essential features must your WordPress site absolutely have? This is the section where you will list the options that seem essential to you.
For example, if you want your service provider to design a WooCommerce store, indicate:
- how it works;
- the desired delivery methods;
- the payment gateways to integrate (PayPal, Stripe, etc.);
- the number and type of products to add (physical, downloadable);
- shipping costs;
- setting up VAT and its rate;
- product variations (size, color, etc.);
- inventory management;
- invoicing, etc.
Other possible examples: you want to include on the site a secure customer area, a members’ area to create a community, a blog to highlight your content, a newsletter to collect email addresses.
Technical information and constraints
Here, specify the technical constraints associated with the project by providing information on:
- the preferred technologies for creating or redesigning your site. In principle, you will go with WordPress ;-).
- the browsers on which your website must display correctly: Chrome, Mozilla, Firefox, Opera, Edge, etc.
- domain name and hosting management: who will handle it if you already have a hosting provider? What are your requirements if you want to subscribe to one or change it? Perhaps you would prefer dedicated hosting rather than shared hosting, for performance reasons? Specify this;
- any integrations with third-party systems, such as a CRM (Customer Relationship Management) or an ERP (Enterprise Resource Planning);
- copyright regarding the texts and images you will use. Are the images royalty-free? Do you have your own photos?
- the desired screen resolution;
- the language into which the site should be translated if you want to set up a multilingual site;
- requirements regarding WordPress security: plugins to activate, spam management, two-factor authentication, HTTPS, etc.
- the implementation of a Web Analytics solution, such as Google Analytics or Matomo;
- the social networks to display on the site: Facebook, Twitter, Instagram, LinkedIn, etc.;
- the email marketing tool you use, such as Mailchimp, SendinBlue, or ActiveCampaign.
Content
Finally, describe all noteworthy information relating to content:
- what types of content need to be created: blog posts, videos, interviews, ebooks, case studies, etc.;
- who will create them and in what formats (list the most important content already available, if you have any);
- your needs in terms of search engine optimization (SEO): site structure, loading speed optimization, semantic audit, keyword research, installation and configuration of dedicated plugins such as Yoast SEO, etc.

Step 5: Specify the expected services in the website specifications document
Now, on to step 5 of creating the specifications document for your WordPress website.
You must now list all the services needed to create the website, presenting your requirements.
In this section, list the features and content you want to create, so that they can be brought to the service provider’s attention:
- handling the creation or redesign of the website;
- management of hosting and purchase/renewal of the domain name;
- creation of the various pages and sections;
- web design, creation of a graphic charter and a logo;
- search engine optimization;
- possible maintenance service, to ensure that your WP site is functional, secure and optimized 24/7;
- need for training on the WordPress CMS in order to gain as much independence as possible after the site is delivered;
- bringing the site into compliance with the GDPR (General Data Protection Regulation), etc.
All these elements will help the service provider prepare a realistic, detailed quote tailored to the client’s needs.
Step 6: Establish a delivery schedule and a budget
The final step in drafting the specifications for a WordPress website first consists of specifying your project creation and delivery schedule.
Specify your desired go-live date. Your service providers will then be able to assess the feasibility of the project and make any recommendations.
They will then inform you of the deadlines for the various deliverables (delivery of mockups, pre-production, acceptance testing, go-live, etc.). Regarding timelines, also specify the deadline for receiving quotes.
Finally, be sure to indicate your budget in the specifications. Here again, this information is essential to allow service providers to estimate the workload and its consistency, and to save time for all parties involved.
An example of a well-structured WordPress specifications document
In summary, here is an example of website specifications, in terms of its overall architecture.
You can use it, in addition to the steps listed above, to create your own.
I – Presentation of the company and the project
- Presentation of the company and the project
- Presentation of the stakeholders
- Details of the creation objectives
- Definition of the target audience
II – Definition of your users’ needs
III – Description of the website’s graphic and ergonomic aspects
- The graphic charter
- Ergonomics and navigation
- Zonings, wireframes, and mockups
IV – The functional and technical aspects of the project
- The site structure
- The expected features
- Technical information and constraints
- Content
V – The expected services
VI – The delivery schedule and budget
Need to go further?
The specifications for a WordPress website are a fundamental document when creating or redesigning a website.
It allows you to clearly set out your needs and objectives, while also presenting the essential features and technical recommendations.
Thanks to it, you make sure you are heading in the right direction, save valuable time, and facilitate communication with your client and/or your service provider.
Would you like support in drafting specifications?
Specialized in WordPress website creation, the Maintenance WP experts can offer you a tailor-made solution that will meet your needs quickly, professionally, and effectively.